
Thursday, May 31, 2012
The Beautiful Bones
The talented Brian Demski brings us this wonderfully gothic juvenile funerary display. Maybe it's just me, but I never found fetal skeletons creepy or disturbing until I had children of my own. Now they pin the needle on my personal Ick-O-Meter.

Wednesday, May 30, 2012
The Black and the White
B. de Corbin brings us a pair of artifacts dating back to the French revolution. The craftsmanship of the so-called Montathos Bracelets is outstanding, but it's the history behind them I find truly intriguing.


According to the story I’ve heard, the French metal smith and mystic Pierre Montathos (1753 - 1793) received two mysterious stones from that strangest of all characters, the Compte de St. Germaine, whose biography weaves it’s way in and out of the historical record for well over two hundred years. Some claim that St. Germaine was a pretender and a charlatan who preyed on the naïve occult longings of the French aristocracy, while others believe he was exactly what he claimed to be - an Alchemist who had discovered the secret elixir of immortality during his wandering in the Far East.
Whatever the true truth may be, we know that the Compte de St. Germaine moved, for a time, amongst the very highest levels of French society… and also, the very lowest. Somewhere between the two he ran into Pierre, they became friends and carousing buddies, and the Compte gave the two stones to Montathos, instructing him in their use.
According to St. Germaine, which we have from the fragments of Montathos’ notebooks which survived the Terror, the two stones were a matched set carved from the last two known hippogriff eggs (this explains why the hippogriff, if it ever existed, is currently extinct). One was a black egg, the other a white. Together, they form a matched pair, which, when brought together and arranged in a certain manner so as to form an Alchemical Conjunction, give the one who can use them all the powers that lie between dark and light - in other words, infinite power.


Tuesday, May 29, 2012
Riven Puzzle Ball
Pirkleations brings us this D'ni wooden puzzle ball based on the "Riven" video game. The entire Myst series was filled with beautiful design work. It's too bad the online version of the game didn't catch on. It would have been cool to have an official line of reproductions similar to the ones for "World of Warcraft".


Monday, May 28, 2012
Quick and Dirty Intestines
The talented Allen Hopps brings us this video tutorial on making prop intestines with nothing more than plastic wrap, some paint, and a heat gun.
One of the reasons I like Mr. Hopps self-described ghetto* approach to propmaking is how flexible the basic techniques are. As he briefly mentions near the end of the video there's so much more you can do with his layered melting procedure than just making intestines. The gnarled organic texture the tube molding approach produces is ideal for tentacles, tendrils, worms, vines...anything long and ropy. Mold it to a flat surface and you could create everything from fleshy tome covers to biological artifacts and massive wall panels for a set.
*Personally, I prefer the term "redneck engineering" because that's the kind of duct tape and baling wire tinkering I grew up with. You can take the boy out of the trailer park, but you can't take the trailer park out of the man. Heh.
Sunday, May 27, 2012
Mongolian Death Worm Gaff
This "Mongolian Death Worm" was the result of an experiment using vintage gaff making techniques. I wanted to recreate the process of crafting a sideshow display using materials available in the early 20th century. Except for cheating on the teeth, which were made from epoxy putty, I used traditional paper mache for the entire specimen. It's nothing more than paper, flour, cotton fiber, and glue. The surface finish is acrylic paint with a wash of wood stain. The entire piece is about 18" in length.
As a proof of concept it's reasonably successful. From five feet away it looks convincing enough to pass for a real mummified specimen, but that's an admittedly low hurdle to jump. In terms of the sculpting it's definitely not up to modern standards. That's a failure of effort, not of the materials. The fine paste I used for the inner mouth is capable of holding the same amount of detail as clay. I simply didn't take advantage of it.

This shot from about two feet away gives a good feel for what worked and what didn't. At this distance the wrinkled texture on the body holds up really well. It was formed using a thick layer of cotton fiber saturated with a mixture of white glue, flour, and water. It would be even more convincing if I had used a thicker layer of fiber to create deeper indentations and sharper ridges.

The mouthparts are where there's the most room for improvement. I wanted a smooth texture for the "gums", and in that respect applying a layer of paste over the paper ring holding the teeth was a success. What's missing is a greater textural contrast between the body and the mouthparts.

This view is a good demonstration of how the specimen could be improved. Building up the demarcation between the wrinkled skin and the gums would give a more convincing impression of the mouth extruding from inside the body cavity. A lot of that relatively smooth finish should be replaced with some fleshy ridges supporting the teeth and running perpendicular to the body rings. It's more anatomically correct and would provide a better visual contrast.

From here you can see that the teeth are kind of bland. The points need to be sharper and their density needs to be increased. There are also some major problems with gluing them to the underlying support ring and then applying the paste for the gums. That approach produces a sloppy finish that splashes on to the teeth and is devilishly hard to clean up. The socket structure for each tooth needs to be applied individually and then glued to the foundation ring. That would solve the splash problem and look more believable, as well as producing some of the much needed texture I mentioned earlier.
Despite validating some of the techniques I wanted to try there's a lot wrong with this specimen. And that's a good thing. Not to get all meta, but one of the most valuable lessons in art, not to mention life, is to embrace the suck. Failure is your friend. A willingness to recognize it is the only way to improve yourself and your craft.
Saturday, May 26, 2012
At the Mountains of Madness Project Update
Things are moving along with the ATMOM prop project, but most of what I'm working on is mind-numbingly boring.
The biggest issue I'm having problems with is, of all things, paper stock. I originally commissioned the talented Danny Cruz to do the Dyer sketches from the exploration of the Elder Thing city (1,2,3,4) back in 2009. I want to include the sketches in the prop set, but finding a printer that can do the run on textured art paper at a reasonable cost is turning into a nightmare. Unfortunately, I'm close to exhausting my options and may be forced to run them off manually with a laser printer. That would be a less than optimal solution.
A similar problem comes up with the expedition photographs. Every single developing house I've contacted, and I've gone through dozens by now, uses branded photo paper. I know I'm being picayune, but I absolutely hate having modern logos plastered all over the back of photographs that are supposed to be from the 1930's.
I'm also working on finding good crates for the deluxe sets. I need something made from unfinished wood with interior measurements around 9" by 13" by 5". So far all the models I've sampled in that size class haven't been quite right, being either too flimsy or too heavy. Ideally I want something constructed like a lightweight shipping crate that doesn't look too modern or overly finished. That rules out a lot of the commercially available gift boxes and media cases.
I may be acting a bit too anal retentive about this stuff, but I'd much rather take my time and make the final project truly memorable than rush to get it finished. The deluxe sets in particular are something I really want to get right.
As always, your thoughts and suggestions are appreciated.
Friday, May 25, 2012
Innsmouth Specimens
Tóbal brings us an intriguing sampling of specimens gathered from Innsmouth, Massachusetts. The mark of the Deep Ones takes many forms.


Thursday, May 24, 2012
Cthulhu Fhtagn! McKittrick Edition.
The talented Jason McKittrick brings us this outstanding Cthulhu idol based on the Dogu figures of Japan. I've said before how much I love different cultural takes on the traditional Cthulhu statuette. What's great about this particular style is that it also taps into the ancient alien mythology built up around Dogu figures by the UFO sub-culture.


Wednesday, May 23, 2012
Deep One Skull
Justin Bailey brings us the skull of a Deep One. There are some nice anatomical touches, like the expanded eye sockets and the nearly non-existent nasal cavity.


Tuesday, May 22, 2012
"Game of Thrones" Dragon Eggs
The gifted Mike Iverson brings us this recreation of the dragon eggs from the "Game of Thrones" television series. Anyone looking to make thier own will find his detailed build guide an invaluable resource.


Monday, May 21, 2012
The Shrine of Bothria
Brandon Zimmerman brings us this unusual item from the infamous Hodge collection.

Recently his descendants have recovered a box of Driesback's belongings from his days at Danvers. Along with a multitude of records, photographs, and drawings, five sculptures were discovered - this idol is one of them. This idol is listed in Driesback's correspondence as being "Idol number 1," apparently named by Hodge as "The Shrine of Bothria."
Based off of original drawings and transcriptions of recorded sessions between Hodge and Driesback this idol is believed to be authentic. Hodge believed wholeheartedly that this shrine would protect him from his enemies citing the "Elder Sign," as Hodge calls it (the symbol carved into the back of the shrine), as the main source of its protective power. Hodge also states that the shrine is modeled after a creature called a "Shuggoth." And that it would protect him from "the Deep Ones and The Dreamer. Yet its protection comes at a price."
Several human teeth and dried blood were found along with this idol. In addition photographs of Hodge with numerous self-inflicted wounds, including missing teeth, wrist-wounds, bite-marks and ritualistic cuts on his legs and arms, along with the remains of several small animals have led scholars to believe that Hodge thought the only way to unlock the idol's protective power was to make a sacrificial offer to it of human or animal blood and flesh.

Sunday, May 20, 2012


Saturday, May 19, 2012
The Hoax
Sometimes, tea staining is not enough, as a story I first came across on Boing Boing earlier this week demonstrates.
The short version- an attempted internet hoax quickly unraveled under examination because the organizers tried to rush things along. You can find a much more detailed look at the failed mythmaking in the original Reddit thread and the followup article at The Atlantic. It's a fascinating story, but there is one particular aspect I found interesting- the aging job on the supposed stash of newspaper articles. Sadly, it appears most of the original photographs have been removed from the Reddit thread, but this shot is still floating around.
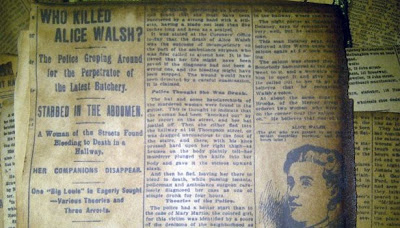
Quite a few of the Reddit comments picked up on the dodgy aging of the newsprint. It's mottled and uneven, with some spots showing little browning while the right edge is so darkened as to look burned. The one nice touch is that notch in the upper right hand corner. It's a pretty convincing duplication of the way old, heavily oxidized newsprint crackles and tears along the grain of the paper, but the treatment isn't carried out consistently along the edge.
At a guess, I think the creator of the aged clipping was reasonably clever, but didn't have much experience with aging paper. After printing out the story on standard 20 lb. printer paper they applied the tea stain by dipping the paper in a bath and then transferred it to a flat, non-absorbent surface to dry. You'll find the directions for doing that in dozens of places, and it's what produced the heavy mottling on the left hand side of the clipping. Then they trimmed down the article to size and recreated the look of extreme edge oxidation with lemon juice and a heat gun.
For a piece of newsprint that's been allegedly stored away for years in a trunk that mottling just doesn't ring true. Since the clips allegedly date back to the mid 1890s the original newsprint would have been wood pulp. Under cover and away from sunlight it will steadily breakdown, but the process occurs very evenly as the lignin in the paper reacts with atmospheric oxygen. You wouldn't get some spots with barely any tinting and others heavily discolored. The variations would be much more gradual.
That problem could have been solved by using a slightly different staining process. To get an even, subtle tint you need to stain the paper and then let it dry very, very slowly. Dipping the paper in a bath and then drying it on a counter-top or cookie sheet can take hours, but it's still too fast.
I would have used a glass sheet as the working surface for the whole process. The first step would be to lay the paper on the glass and apply the staining solution with a sponge to the entire surface, then flip the paper and treat the other side. Let the paper get totally saturated. Then lift it up and gently float it on the layer of staining solution on the glass. Apply even pressure with a damp sponge to the paper and gently push out any air bubbles and excess staining solution from under the paper. Done correctly, the paper will mold itself to the surface of the glass under a layer of the staining solution.
Then you wait.
As the liquid slowly evaporates you'll get a very smooth and even tint across the entire sheet. By gently applying more of the staining solution along the edges of the paper you can prolong the process by maintaining the seal between the paper and the glass. That keeps the paper from lifting, limiting evaporation to just one side of the sheet and preventing any significant mottling. In the end you'll have a faux clipping that has a much more realistic oxidation tint.
In the end I don't think properly aging their prop clippings would have helped the hoaxers much. Their biggest mistake was in rushing the trailbuilding for the story with the iffy Wikipedia entries. But anyone attempting a similar project, purely for entertainment purposes of course, should be aware that there are ways to make their props more believable.
In professor T. Mills Kelly's class, students act out clever public hoaxes. But while Wikipedians are easily fooled, Redditors exposed the latest jape—Do you think my 'Uncle' Joe was just weird or possibly a serial killer?— instantly.
The short version- an attempted internet hoax quickly unraveled under examination because the organizers tried to rush things along. You can find a much more detailed look at the failed mythmaking in the original Reddit thread and the followup article at The Atlantic. It's a fascinating story, but there is one particular aspect I found interesting- the aging job on the supposed stash of newspaper articles. Sadly, it appears most of the original photographs have been removed from the Reddit thread, but this shot is still floating around.

Quite a few of the Reddit comments picked up on the dodgy aging of the newsprint. It's mottled and uneven, with some spots showing little browning while the right edge is so darkened as to look burned. The one nice touch is that notch in the upper right hand corner. It's a pretty convincing duplication of the way old, heavily oxidized newsprint crackles and tears along the grain of the paper, but the treatment isn't carried out consistently along the edge.
At a guess, I think the creator of the aged clipping was reasonably clever, but didn't have much experience with aging paper. After printing out the story on standard 20 lb. printer paper they applied the tea stain by dipping the paper in a bath and then transferred it to a flat, non-absorbent surface to dry. You'll find the directions for doing that in dozens of places, and it's what produced the heavy mottling on the left hand side of the clipping. Then they trimmed down the article to size and recreated the look of extreme edge oxidation with lemon juice and a heat gun.
For a piece of newsprint that's been allegedly stored away for years in a trunk that mottling just doesn't ring true. Since the clips allegedly date back to the mid 1890s the original newsprint would have been wood pulp. Under cover and away from sunlight it will steadily breakdown, but the process occurs very evenly as the lignin in the paper reacts with atmospheric oxygen. You wouldn't get some spots with barely any tinting and others heavily discolored. The variations would be much more gradual.
That problem could have been solved by using a slightly different staining process. To get an even, subtle tint you need to stain the paper and then let it dry very, very slowly. Dipping the paper in a bath and then drying it on a counter-top or cookie sheet can take hours, but it's still too fast.
I would have used a glass sheet as the working surface for the whole process. The first step would be to lay the paper on the glass and apply the staining solution with a sponge to the entire surface, then flip the paper and treat the other side. Let the paper get totally saturated. Then lift it up and gently float it on the layer of staining solution on the glass. Apply even pressure with a damp sponge to the paper and gently push out any air bubbles and excess staining solution from under the paper. Done correctly, the paper will mold itself to the surface of the glass under a layer of the staining solution.
Then you wait.
As the liquid slowly evaporates you'll get a very smooth and even tint across the entire sheet. By gently applying more of the staining solution along the edges of the paper you can prolong the process by maintaining the seal between the paper and the glass. That keeps the paper from lifting, limiting evaporation to just one side of the sheet and preventing any significant mottling. In the end you'll have a faux clipping that has a much more realistic oxidation tint.
In the end I don't think properly aging their prop clippings would have helped the hoaxers much. Their biggest mistake was in rushing the trailbuilding for the story with the iffy Wikipedia entries. But anyone attempting a similar project, purely for entertainment purposes of course, should be aware that there are ways to make their props more believable.
Friday, May 18, 2012
The Starry Stars are Right
Vincent van Gogh has all the hallmarks of a traditional Lovecraftian protagonist. Brilliant and tortured, he perceived a world beyond the view of most men and brought it to life with his art. Like so many before him that vision would bring him to the edge of madness and beyond, eventually resulting in his voluntary commitment to the asylum at Saint-Rémy. While there he would paint his most famous creation- The Starry Night.
Traditionally, the painting is a view of the northern night sky from his sanatorium window. Raven was kind enough to point out a quite different interpretation, based on a curious feature on the right edge of the painting.

Enlarged and with a tweak to the contrast.

What is it? As Raven offers...
The thought that one of the world's most well known paintings has a definite R'lyeh-ish aspect may be a bit outré. In that case, this serves as a good example of how a little creativity and a willingness to exploit pareidolia can inject the Mythos into almost anything.
Traditionally, the painting is a view of the northern night sky from his sanatorium window. Raven was kind enough to point out a quite different interpretation, based on a curious feature on the right edge of the painting.

Enlarged and with a tweak to the contrast.

What is it? As Raven offers...
Great Cthulhu looms darkly as he rises from the sea, causing a tsunami
to rush upon a sleeping town. Detail of Van Gogh's painting "The Stars
are Right"....
Visible and unmistakably recognizable are Cthulhu's tentacled head
with gleaming black eyes; his right arm (from shoulder to elbow)
pushing him up; and the corner and tip of his right bat-wing behind
his head.
The thought that one of the world's most well known paintings has a definite R'lyeh-ish aspect may be a bit outré. In that case, this serves as a good example of how a little creativity and a willingness to exploit pareidolia can inject the Mythos into almost anything.
Thursday, May 17, 2012
Mother Hydra
The talented Jason McKittrick brings us this idol of Mother Hydra, just one of the many items seized during the raid on Innsmouth.


Wednesday, May 16, 2012
The Cthulhu Pendant
Special effects designer Luis Alberto Cayo currently has a project up on Kickstarter to fund the production of a very nice Cthulhu pendant. It's a quality sculpt, albeit digital, and I think the pledge level for obtaining one is very reasonable.
That said, and with all due respect to Mr. Cayo, I think his marketing video actually hurts the likelihood of the project succeeding. His heart is in the right place, but I don't think an appeal based on "Help me start a business so I can work at home and spend more time with my family" is the right approach.

That said, and with all due respect to Mr. Cayo, I think his marketing video actually hurts the likelihood of the project succeeding. His heart is in the right place, but I don't think an appeal based on "Help me start a business so I can work at home and spend more time with my family" is the right approach.

Tuesday, May 15, 2012

Monday, May 14, 2012
The Time Machine
Joseph Harlow brings this this absolutely gorgeous Victorian-style time machine. It was crafted from black walnut, custom brass etchings, and found brass accouterments.


Sunday, May 13, 2012
The Heart of Hrungnir
Philip Obermarck brings us the mummified heart of a Norse giant.


While going through his famous grandfather’s belongings after his passing in 1937, violinist Lars Sigerson discovered this casket with its gruesome contents. It appears to have been passed from generation to generation within his family for hundreds of years. The explanation and whatever story that goes with it has been lost to the ages.
The inscription on the casket is written in old Norse runes and reads:
“Behold! Within this casket lies the heart of the fierce and terrible giant known as Hrungnir, slain this day by Fafrd the Red whose bravery and cunning shall live forever!”


Saturday, May 12, 2012
The Gash
Muck Effects brings us this handy tutorial on creating a slashed wrist effect. The materials are dirt cheap, and the technique is ideal for any kind of gaping wound.

Via Lost In Schlock.
First apply a layer of liquid latex to the wrist. It's up to you how big or small you want the wound, mine is quite large. Then carefully apply a piece of tissue paper to the latex. Make sure the edges of the paper are torn as this will blend better than straight edges.
Repeat this until you have 5-7 layers. Try to avoid making all of the pieces the same size. This will make it look like something stuck onto your arm. Try to leave the outer edges thinner and the centre thicker.
For the last few layers of latex I added a small amount of red and yellow acrylic paint to achieve a flesh tone. The colour didn't work out great with the acrylics so it's up to you whether to do that or not. Although it did create a nice dark ring around the wound.
Wait for latex to dry - 5 mins at the most.

Via Lost In Schlock.
Friday, May 11, 2012
The Curwen Legacy
Jason McKittrick delves into "The Case of Charles Dexter Ward" to bring us more artifacts from the infamous career of Joseph Curwen. This set, currently available on Ebay, includes a hand bound leather journal and a beautiful talisman of Yog-Sothoth.


Thursday, May 10, 2012
Cthulhu Fhtagn! Molinares Edition.
This is actually a follow-up post to one I made back in 2009 about an amazing Cthulhu bust that was offered by Detour Studios. I wasn't able to find much information about it at the time, but I was recently contacted by one of the creators. The original sculpt was done by Eric Molinaris and then cast by John Jones in July of 2004 in Haynes City, Florida. The bust was available in kit form and appears to have been sold primarily through mail order and conventions.
The pictures below are of a finished kit from the incredibly talented artist at 3Demonic.
There are still a few unattributed Cthulhu sculpts floating around, but I'm glad I was finally able to attach a name to this one. One of the nice side effects of covering such a niche interest for so long is that the site becomes a Google magnet for the subject. Hopefully more creators of the various "mystery" sculpts will end up here and be able to take credit for their work in the future.


Wednesday, May 9, 2012
Cthulhu Amulet
The gifted Brandon Zimmerman brings us this nicely done Cthulhu amulet. I really like the texture work along the upper body. It brings to mind the pitting found in meteorites or chunks of bog iron.

This amulet was uncovered in 2009 outside the small town of Santa Margalida, on the island of Majorca, Spain. This area, known as the Son Real Necropolis, is an 800-square-foot mass gravesite that dates from the 7th to the 4th century BC. It is located on the small rocky coastal headland of Punta Fenicis and served as a mass burial site where the remains of over three hundred people, including woman and children, were found.
The dead were discovered along with over a thousand strange and unknown weapons, jewelry, and everyday objects, all themed around an apparent octopus-headed creature or god. The origin of the people buried in the necropolis is not clear. Scholars believe it to be a remote settlement of Ancient Romans, or an isolated Pagan cult who worshiped a god of the sea.

Tuesday, May 8, 2012
The Templar Grimoire
Belfeuil brings us this beautiful Templar grimoire. One of the great things about a quality binding is that it will just look better with age and wear.


Monday, May 7, 2012
Tindalosian Hound
The talented Joe Broers brings us a Hound of Tindalos. Between the reddish cast of the finish and the green of the patina I originally thought this picture was a red/green stereogram. Considering the subject matter that would be a very cool effect.


Sunday, May 6, 2012
Frozen Alien Embryo
Adrian Kleinbergen brings us this alien embryo in a cryotube. It features a functioning closure mechanism and rotating mount for the embryo inside the tube. Quite a nice piece of work.


This is a plastic and polymer clay sculpture that was originally meant to be the protoype of a resin model kit but lack of funds ended the project. I then assembled and finished the components into the result you see here. The embryo is about four inches tall and the cylinder measures about 13 inches when sealed. I eventually found a use for it as a cover illustration for a local SF anthology magazine.


Saturday, May 5, 2012
Prop Newspapers and Magazines
Steven J. Weller has posted a great little article on creating prop newspapers and magazines over at the IndyMogul forums. It's aimed at low budget filmmakers, but the techniques are equally applicable to tabletop and live action gaming.
I like to put just the masthead on a single sheet of legal paper, and do the rest of text separately. You're going to paste up the newspaper on a 24" x 36" sheet of paper or poster board, a piece at a time. Make your own headlines, cut columns of text from a real newspaper (or create them yourself if you need something that can be read in a close-up), add black and white photos that you've screen-printed in your favorite graphics program, and take the whole paste-up into your local copy shop. Make an oversized copy onto the newsprint, cut it to size, wrap it around a real newspaper, and you're ready to shoot!
For the back page, I like to use a full page of classified ads or a stock market page, instead of building it all from scratch. No one's ever likely to see much of it, so it just needs to be a page of ND print. You might also use a full-page ad for a car dealership, as they're common in that position - just be sure to change the name of the dealership. There's no need to print anything on the opposite side of the fake front page, and a good reason not to - there's no way for the image to bleed through to the front if there's no image there to begin with. Plus, it only costs half as much to print the sheet on one side, and there's no issue with registration between the two sides.
Friday, May 4, 2012
Cthulhu Medallion
Jason McKittrick brings us this nicely done Cthulhu medallion. I really like the flowing, almost Art Nouveau lines.


Thursday, May 3, 2012
Skyrim Ancient Nord Helmet
The immensely talented Harrison Krix of Volpin props brings us this unbelievable recreation of the ancient Nord helmet from Skyrim. Just reading his detailed and well illustrated build log serves as a master class in prop production.


Wednesday, May 2, 2012
Cthulhu Fhtagn! Zimmerman Edition.
Brandon Zimmerman brings us this interesting Cthulhu idol from the infamous Malcolm B. Hodge.
The piece has a definite Clark Ashton Smith vibe. That's high praise, since I consider him the original Lovecraftian propmaker.

Hodge was a native Rhode Islander and artist who was institutionalized at the Rhode Island State Hospital (RISH) from 1932-1934 after he brutally murdered his wife and child in their sleep. At his trial Hodge blamed his family's death on "The Dreamer." Hodge's lawyers pleaded insanity and claimed he had no recollection of committing the crime. He was later transferred to Danvers State Hospital in the winter of 1934 after a series of strange events at RISH, culminating in the rather unexplainable and graphic deaths of three doctors.
Hodge received acclaim as a cultist after several of his psychotherapy sessions, conducted by famed psychiatrist Dr. Alfred Driesback, were made public. In these published transcriptions Hodge discusses and reacts to five "idols" of his own creation.
An accomplished artists and sculptor, Hodge is believed to have constructed these "idols" from found objects on the RISH campus including scraps of metal, wood, and rock, though how we was able to make them remains a mystery since he spent most of his time restrained in his cell.
While the five "idols" published in the works of Dr. Driesback received significant press in the '30s, they rather famously disappeared shortly after his death. Driesback was found murdered in his home outside of Hathorne Mass. in the summer of 1935, and apparently had the "idols" in his home at the time.
The piece has a definite Clark Ashton Smith vibe. That's high praise, since I consider him the original Lovecraftian propmaker.

Subscribe to:
Posts (Atom)