Body: The body parts are made from Expanding Foam used in packing. I traced a shape of the body part onto cardboard, laid a 3'x4' piece of plastic over it. Traced the shape with hot glue, and put another sheet onto that. Thus, I have a plastic, semi-balloon-like mold. I sprayed the foam in and it expands to fill the shape I outlined. I did this for 3 upper body parts, and 3 abdomen parts. I sort of based the shape on wasp bodies.


The fast foam from work is very fragile. You can press your fingers into it very easily. Great Stuff foam insulation from Home Depot is stronger when it dries. I coated all the body parts with a layer of Great stuff and smeared it around. This gave a nice lumpy surface, and a harder protective outside. I've used this technique on many projects.
Skeleton:
I used 1/2" cpvc pipe for the basis of the rest of the skeleton. The upper body has a rectangle shape aligned vertically to the body. The top bar is the attachment for the wings, the bottom bar is the attachment for the legs, the front for the head, and the back is for the tail.
I attached two tubes to each side of the upper skeleton. These are where the wings would set into. (more on wings later). From the front bar of the rectangle, there was a T fitting. I drilled a 1/2" hole in the juncture, so I could slide it onto the vertical front bar. Thus I had one fitting facing forward (for the neck) and two going left-right (for the arms).
I have a hot-wire foam cutter I made and sliced the upper body and tail vertically from front to back. I then carved out the shape of the space where the plastic pipes would fit inside. I used Great stuff as "glue" to put it back together with the appropriate parts stick out.

Legs:
I wanted the legs to be springy and tried 3 or 4 designs before I found a simple solution. The leg sections are the same pvc pipe. each section is cut at an angle for the bend of the legs. Two holes are drilled and the top of each joint. Two sections are attached at the joints with two small tie-wraps. There is 1" piece of pipe with a 45 degree connector on each side. This is the leg "hub" for each pair of
legs. 3 sections make up each leg. The claw is a salad fork. You can find them cheap at Party City stores. Each section has a 3-foot piece of bungee cord running through it, to the hub, and through to the next section. The cord is pinned at the end of each leg. This gives the sections the bounce and the tie wraps keep them bending just one directions.


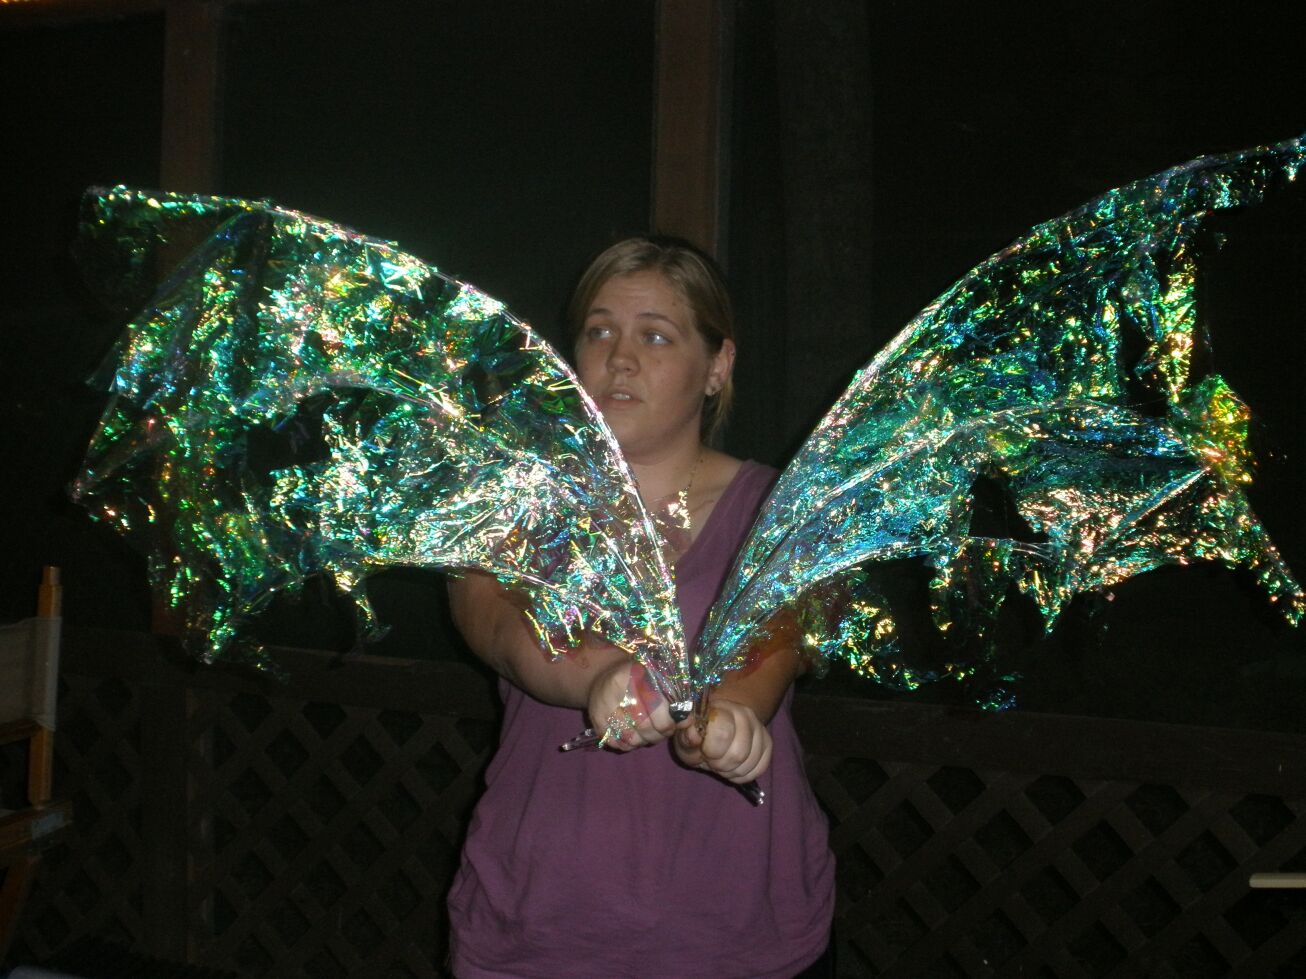
Wings:
The wings are made up of three rods of 1/4" Plexiglas and iridescent cellophane wrapping. Rods were bought from a plastics supply company I frequent. The wrapping was from Party City, and it took two rolls, counting trial and error. The rods were cut into 3-foot lengths. A heat gun was used to put a curve into each rod. A bend 6 inches from the end was put a one end, to act as the mounting point. 3 rods were taped together at this straight mounting end, and fit into the vertical tubes in the back of the migo body. The three rods were kept spread apart by a springy piece of wire from an old Car window shade. Small loops were bent into the ends of the wire, and it was tie-wrapped to the wing-rods. With the shape in place, the cellophane was cut into strips, crumpled up, smoothed out and hot glued to the wing rods. This gave a torn, ragged, ethereal look to the wings.

Head:
This part I was never happy with the results. I did a lot of trial and error and finally settled on this design. They looked a bit better in real life than in the pictures. I started with a foam ball shape about 6"x4" in rough shape. I had found some LED lights, battery opperated, each one color changing. I embedded the lights randomly around the foam core, and hot glued them into place. I crumpled a ball of cellophane and glued it over each light to diffuse it (this did not work as well as I would have liked.) I then covered the whole head with bubble wrap to simulate the "brain-like" nature of the Migo head.
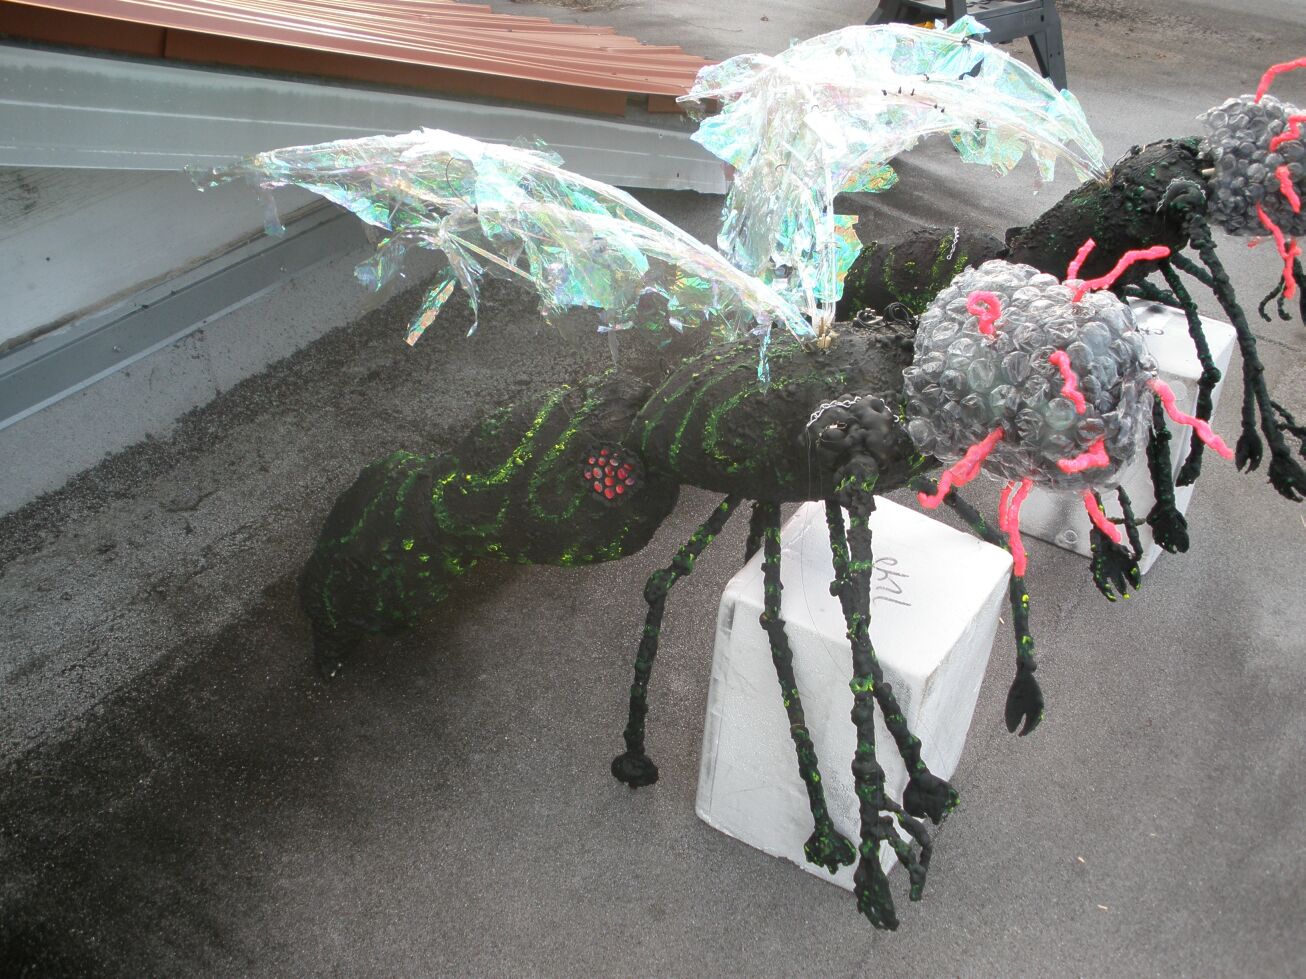
The antenna came out well. I took pipe cleaners, smeared the Great Stuff foam on them and allowed to dry. These were painted with red fluorescent paint. I stripped about 1 inch of the end, applied hot glue and stuck it through the bubble wrap into the core foam. Those came out well. The "neck" part of the skeleton was an 6" pointed piece of pvc, so I just stuck the head on. The batter pack (4 AA batteries) was embedded into a slot cut in the upper back of the body section. Since the migo were hanging in the air, and it was dark, it could not be seen.
All of the parts except the wing were painted with Krylon Ultra Flat black paint. I used Wildfire fluorescent yellow in a type of highlighting technique to paint the lines on the body. I kept the brush kind of flat, and drug it over the lumps the foam made. This produced a nice effect.


Each of the migo had three attachment points for lines to hang them on. One at each shoulder and one just before the tail section. Wire then ran to a large, bamboo pole with a cross piece. This allowed my minions to dangle them off the roof during the presentation.

3 comments:
Hi. I'm Mark Jones, the creator of the Migo props. The last construction picture is from a paint test where I hung it outside to see how it would show up.
If anyone would like to comment to me directly, you can email me at jomark (at) stonehill.org
Impressive stuff!
The way you made the moulds for the body parts is ingenious.
I use that expanding foam at work and have often thought about using it for some large 'alien' type monsters.
Looks like I might have to have a go now :-)
These are AWESOME.
Post a Comment